
Importing your Epicor data doesn’t have to be complicated. Thanks to REST Services, your Epicor software and Microsoft’s well-known accounting program Excel connect like two long-lost friends after a breakup. Sort of like what peanut butter does for jelly. If you’re looking for a simple way to import your Epicor data into Excel, we’ve got the perfect solution for you.
REST stands for Representational State Transfer. It is an architectural style and a set of guidelines a software or application leverages to communicate over the Internet to make integration simple and scalable. Though many other API formats and architectures have been introduced, REST remains the most common. More than 93.4% of API developers use REST. If you got lost in our technical jargon, we apologize. You’ll be more interested in hearing about the benefits anyway…
Let’s Talk About the Benefits
You can benefit a lot by importing Epicor data into Excel using REST services. The biggest benefit is gaining offline access to data. You can easily work with data without actually connecting to your Epicor’s software database.
Another benefit is that you can create custom reports. If you’re unfamiliar with why custom reporting is so beneficial to businesses, check this out. Though Epicor software provides the ability to create reports, Excel offers the flexibility to generate customized reports tailored to specific needs. It also integrates data from other sources in a report if required.
Easy data sharing is yet another fundamental benefit. According to Gartner, organizations that offer users access to a curated catalog of internally and externally prepared data will realize 100% more business value from analytics investments than those that do not. Excel files are easy to share within and outside an organization. Furthermore, Excel’s graphing and charting features enable you to generate compelling data visualizations.
Let us walk you through how you can effortlessly import Epicor software data into Excel using REST services. The good news: even your least tech-savvy employee can follow along.
Epicor-Excel Integration Walkthrough
If you prefer video, you can also watch our 4-minute video on how to import Epicor data into Excel outlining these steps.
To help you understand the process of importing data from Epicor to Excel, we will use a sample BAQ. BAQ stands for Business Activity Query. It is a foundational feature of Epicor that offers data-driven integration capabilities. It is a data view definition that you can define once and run safely. When you execute a BAQ, it only exposes the data you are allowed to see.
BAQs serve as a bridge between data and process security aspects. They also enable complex integrations.
Analyzing and Testing BAQ in Epicor
Follow the below steps to analyze and test a sample BAQ in Epicor:
1. Log in to your Epicor software with your username and password.
2. From the main menu, select Business Activity Query.
3. Now, enter the query ID. We will use zcustomer01, as it exists in every training environment.
4. From the top menu, click Analyze and then immediately click Test from the bottom menu.
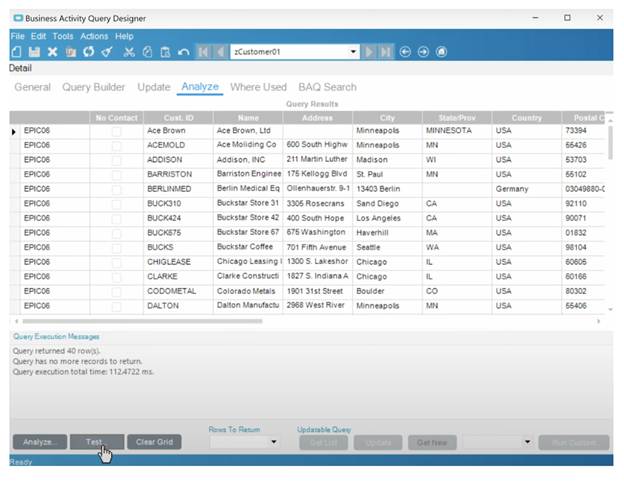
You will get a dataset containing customers’ data. This is the data you would want to import as it is in Excel.
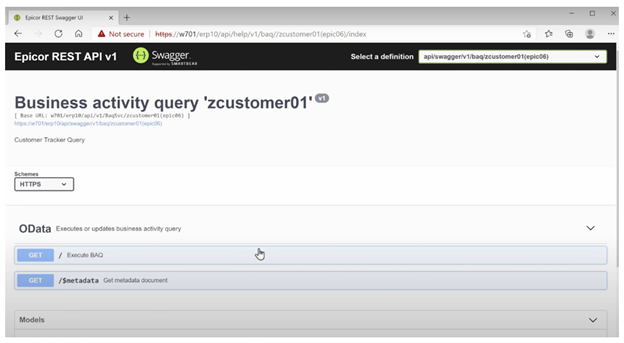
Get the Specifics of the Selected Business Object using REST
The next step is to get the specifics of the selected business object using the REST services. In our case, the business object is zcustomer01.
1. Visit your REST services. https://<servername>/<instancename>/api/help/v1
2. Sign in to access the REST services site using the standard Epicor username and password.
3. After signing in, you will get the REST API landing page explaining how REST services function.
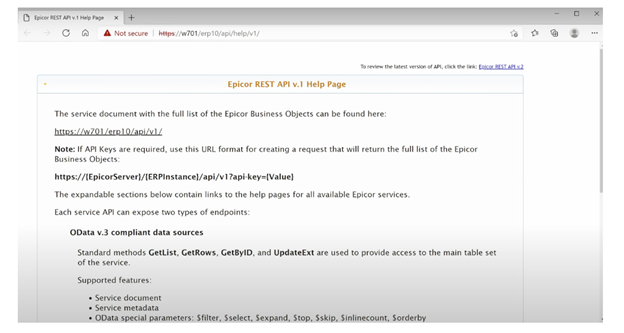
4. Scroll down and locate Business Activity Queries.
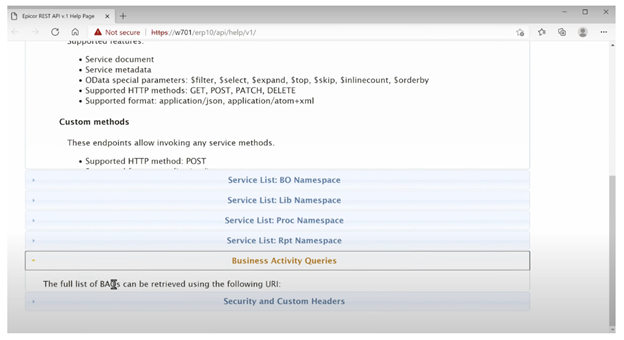
5. Click it and enter the company ID and the name of the Business Activity Query, i.e., zcustomer01. You are ready to run the test for the entered BAQ.
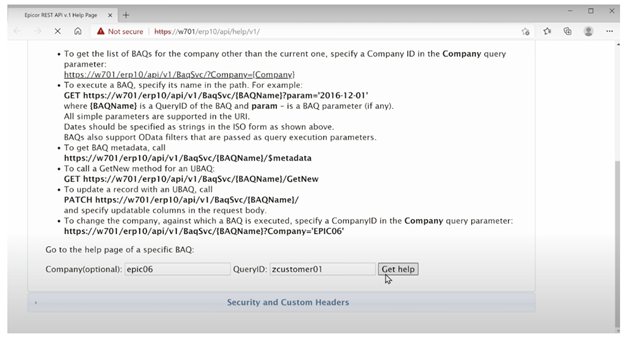
6. Finally, click Get Help. You will be taken to a page containing the specifics of the Business Activity Query ‘zcustomer01’.
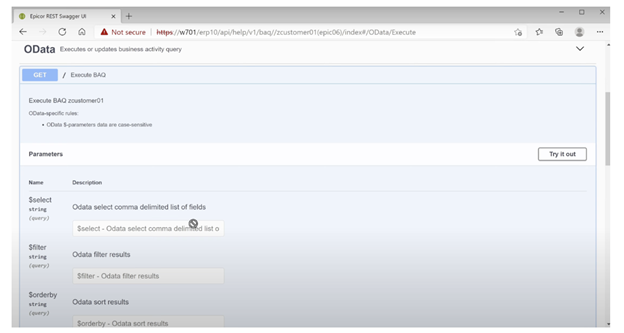
7. Here, we will use Get / Execute BAQ. Scroll down and locate Parameters. Click the Try it out button next to it.
8. Again, scroll down and tap on the Execute button to execute your BAQ.
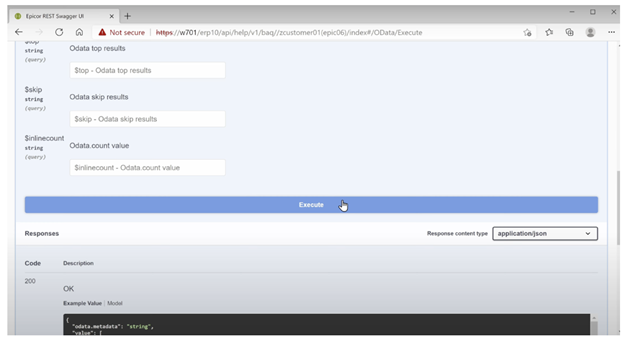
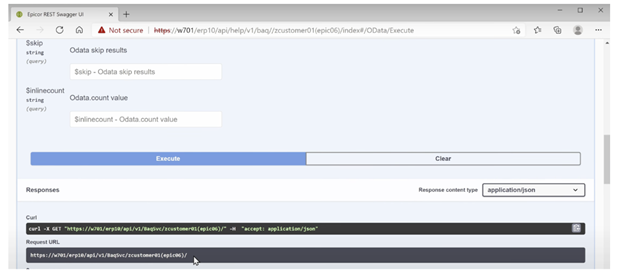
9. After you get the result, copy the Request URL, as you will need it later.
You are done with configuring REST!
Configuration in Excel
Now, it is time to import your Epicor software data into Excel.
1. Open a blank sheet in Excel.
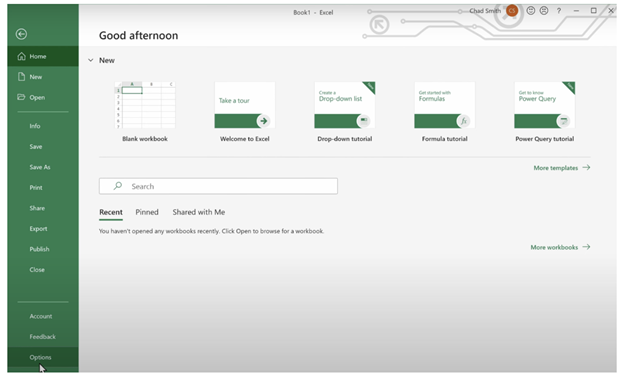
2. From the top menu, choose File → Options.
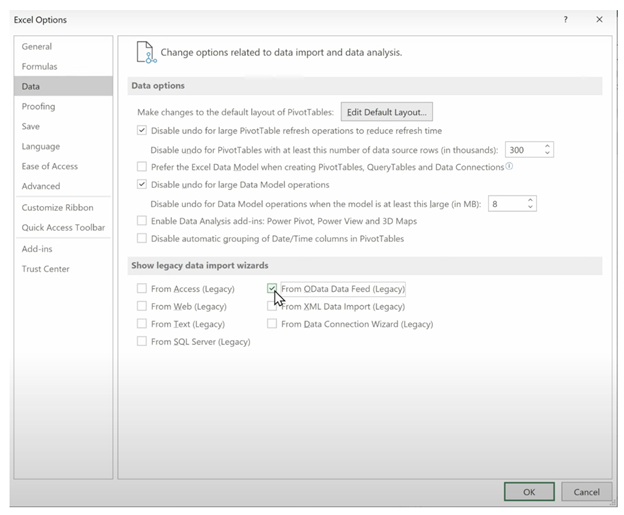
3. Select Data from the options, enable the From OData Data Feed (Legacy) option, and click OK. Otherwise, it would not be possible for you to use the REST services V1 connection.
4. Choose Data from the top menu. Under the Get Data option, visit Legacy Wizards, and select From OData Data Feed (Legacy).

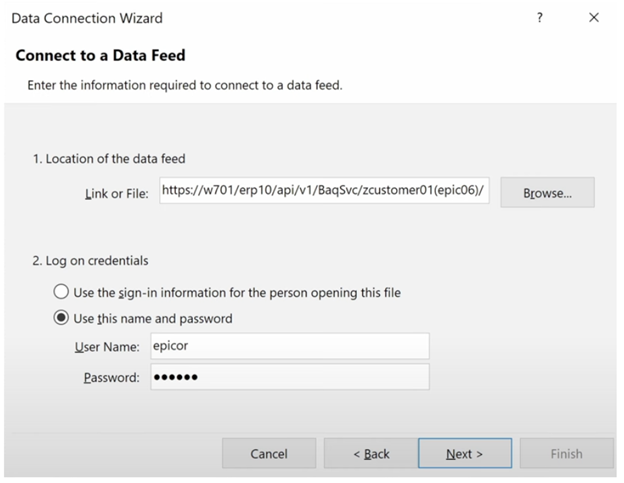
5. A Data Connection Wizard appears. Now, paste the copied Request URL from the REST service.
6. Choose the Use this name and password option and enter valid Epicor credentials.
7. Finally, click Next.
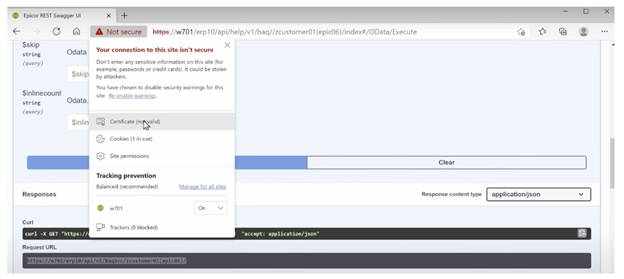
Many of you might encounter a certificate error. Don’t worry! Even if you encounter it, here is how to resolve it.
How to Resolve the Certificate Error?
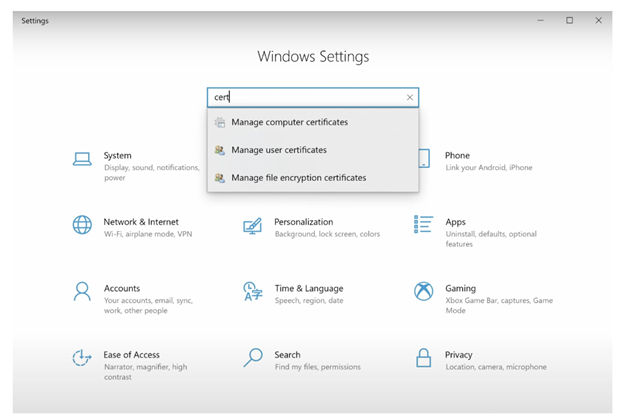
1. Go to system settings.
2. Search for “certificate” and choose Manage computer certificates from the drop-down list. This will take you to the certification manager. To perform further functions, you need to be a local administrator.
3. In the browser where we copied the Request URL, click the not secure icon from the address bar and choose the certificate option.
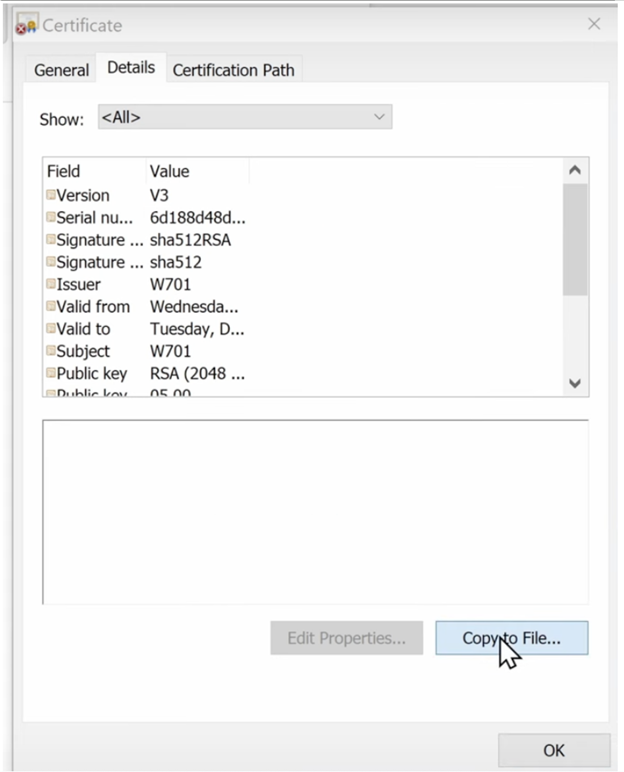
4. Under the Details option, click Copy to File to export the certificate.
5. The Certificate Export Wizard appears. Tap Next until you see the text field with the label File name.
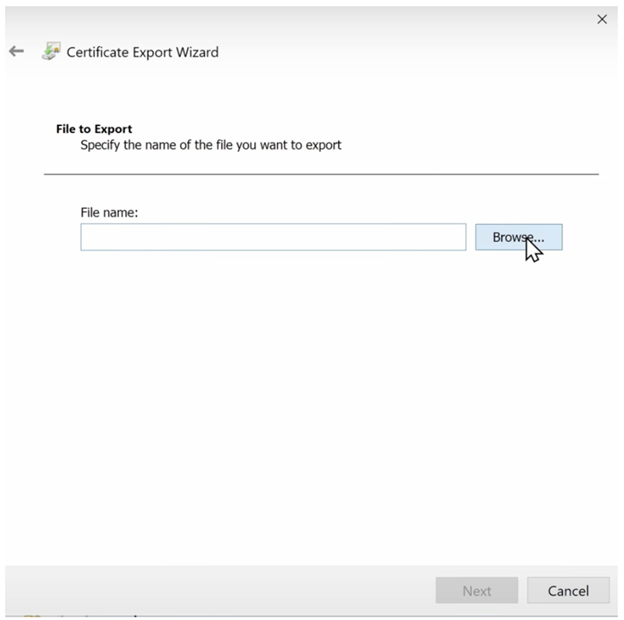
6. Now, click Browse and choose the location and file name on your local system to export the certificate.
7. Copy the location and paste it into the text field with the label File name and hit Next → Finish.
8. Go to Certificate Manage on your system and select Trusted Root Certificate.
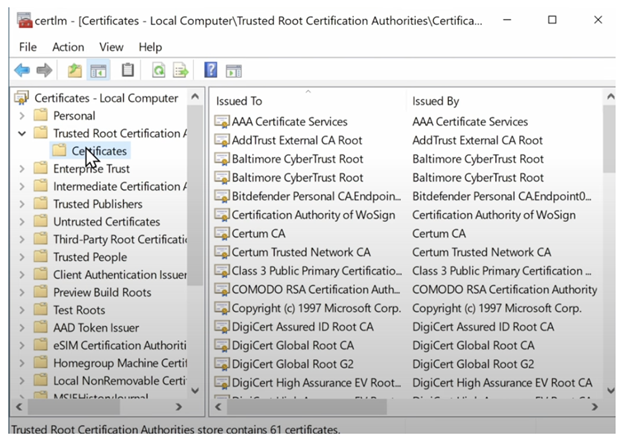
9. Right-click the Certificates folder and select All Tasks → Import → Next.
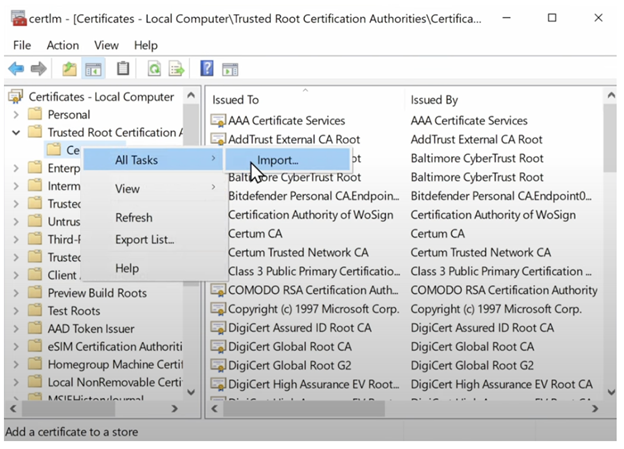
10. From the import menu, select Browse, choose the exported file, and follow the further instructions until you get the message “Your Import was Successful”.
11. Choose the exported file, and follow the further instructions until you get the message “Your Import was Successful”.
You have now successfully fixed the certificate error.
Successfully Display the Epicor Dataset in Excel
These steps (1-3) are repeated from above.
1. Open Excel and select Data from the top menu.
2. Choose Get Data → Legacy Wizards → From OData Data Feed (Legacy).
3. Paste the copied URL from the REST service, enter the valid Epicor username and password, and tap Next.
4. The Data Connection Wizard appears. Mark both the options present, click Next, and follow the further instructions.

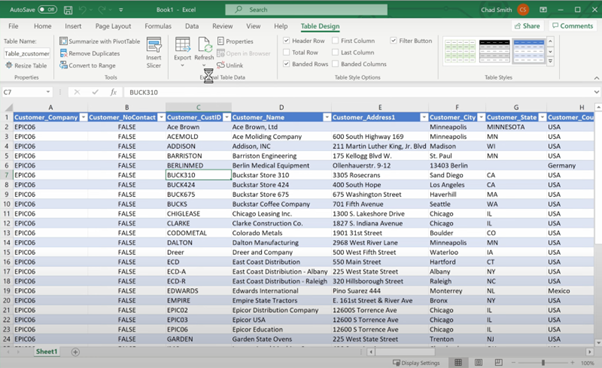
Voila! Excel will have your Epicor data!
Conclusion
Easily import Epicor software data into Excel with the above steps and access your data offline! The advantages of doing so are beyond offline access. As we mentioned, with your data now in Excel, you can create customized reports and compelling data visualizations. Also, data sharing and data integration become easier because of Excel’s features. This provides immense long-term benefits to your business that we’ve only just touched on in this blog.
If you run into any problems while following the above process or have any questions on how you can import your Epicor software data into Excel, reach out to us.